I like tweed a lot. My whole motivation for getting a weave-it loom was so I could make tweed. The instructions for twill (diagonal weave) provided with the weave-it loom are a bit confusing and I imagine they deter many people from trying it out. That, and the regular woven squares are really cute too!
For more info on Weave-it looms and what you can do with them check out Eloomnation and the "week" of weaving over at Girlontherocks.
This is a my attempt at shedding some light on the process and hopefully clarifying the instructions for how to make your very own "diagonal weave" square. I made a full set of photo-instructions on flickr complete with notes. Below I have my general rules and tips. I should point out that my definitions of tweed, twill, diagonal-weave, stitch, and strand may not be strictly accurate but hopefully they are logical.

To make a diagonal weave square you will need:
weave-it loom (I think all the sizes will work but Ive only done 2" and 4")
weaving needle
two colors of yarn
instructions
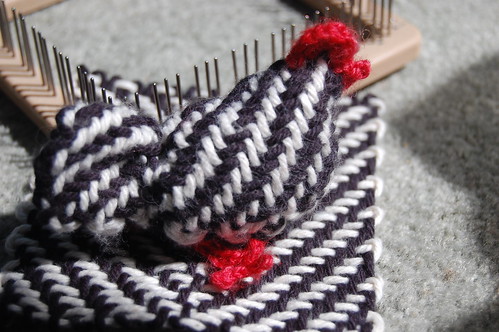
tweed chicken for company (not strictly necessary)
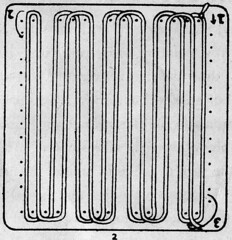
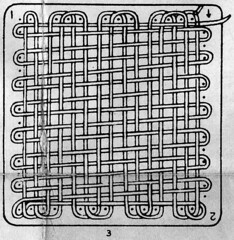
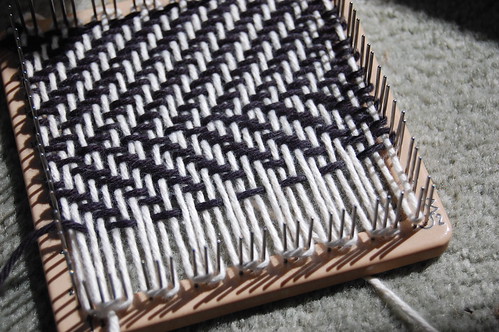
You will wind the white yarn around the loom (diagrams 1 & 2) and then weave in the black yarn with the weaving needle (diagram 3). Full photoset with instructions on flickr.
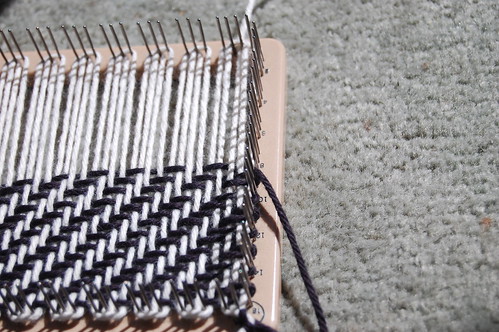
Diagonal weave (as the Weave-It loom instructions call it), or twill, is made by going over and under two strands and offsetting the stitch by one strand each row. This is the basic pattern you will follow, and it helps me to keep that in mind when Im trying to remember what to do next.
The weave-it diagrams for diagonal weave (courtesy of Karrie). Also a very useful chart. Click through to flickr for a few clarifying notes.

Tricks and Tips for diagonal weave
- The very first row is different than all the others in two ways.
- Row 1 is a 1-1 row, meaning that it is woven under one-over one all the way across (starts with under). All other rows are 2-2 rows (over two-under two) with some exceptions in the edge stitches.
- The yarn at the end of the first row should go to the outside of the corner pin (see this photo and diagram)
- Rule 1: The black yarn should always overlap one stitch with the previous row and advance in the correct direction. This should help you decide whether to start the row with an over or under.
- If you are weaving standard twill (not changing directions) the rows originating on the right-hand side will always begin 2-2 while rows originating on the left-hand side will begin 1-1. They both continue across with 2-2.
- Rule 2: The black yarn should always go around the white yarn on the edge stitches. This means that if you end by going under the last strand you need to go over it at the beginning of the next row. This will also help you catch mistakes when you start the next row. If you make a mistake you will not be able to both begin the row correctly and follow rule 2. When doing herringbone tweed you will have to be extra diligent to make the edge stitches are "captured".
- Mistakes arent hard to fix, just weave backwards with your needle to the location of the mistake.
- The last row can be very tight and difficult. Try doing it in sections so you can get more leverage on the needle.
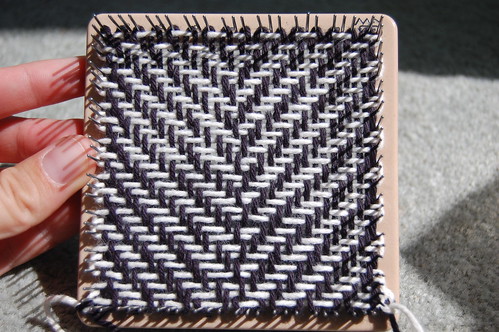
Herringbone tweed is made with this same advancing stitch pattern but with directional changes. This poses a few additional complications. At the apex of the direction change there is a full two stitch offset (as opposed to the normal one stitch offset). I do one direction change in the example, but I like to do them every 5-6 rows for a more typical tweed look.
- At the apex of the direction change offset weave the opposite pattern from the previous row. This will be a full two stitch offset.
- Rows originating on the right-hand side will begin 1-2
- Rows originating on the left take some more planning to satisfy both rules 1 and 2. I suggest ENDING the previous row with 1-1. This can be accomplished by backstitching one (see photo). If you do this left rows begins with 1-2. Otherwise you will have to begin 1-1-1 which I feel is invasive to the pattern.
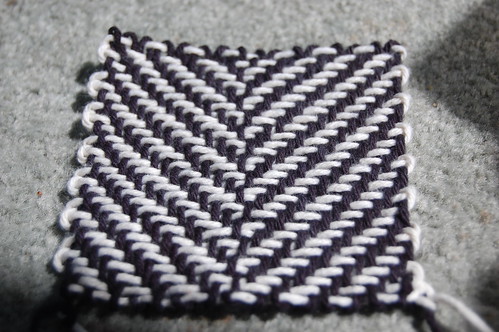
The finished square on the loom:
and off:
Please let me know if you have any questions about my explanations, the
photo-tutorial, or diagonal weave in general. Ill do my best to answer them!